Showing posts with label General. Show all posts

Saturday, 7 October 2017

What is Dark Web , Deep Web And Surface Web ?

Friends, We all use internet daily. Did you you know that there is a very big section of internet which you would never use? Today I will tell you about those sections which are Deep Web and Dark Web.
Internet is divided in to 3 sections or you can say layers, Surface Web, Deep Web and Dark Web.
Every one of you might know about Surface Web Internet, if not I will tell you about it today.


SURFACE WEB

It is the internet which is used most commonly by everyone in the world, and will be using in future and even which I use.That is called as Surface Web, in fact this video which you are watching now is also a part of Surface Web. Surface Web is the internet which is accessible anywhere in the world without any special permission, And Information about Surface Web is easily accessible in a simple Google search. That means all the information you get in Google search results such as links
or websites are all part of Surface Web because it is publicly available for everyone. For example, all your Entertainment Websites, News Websites, Music Websites, Torrents, and all the information you were using till today is all part of Surface Web. But do you really know that Surface Web is only 5% of actual internet? According the recent studies nearly 95% of internet is on Deep Web, if you compare Deep Web to Surface Web with an Ice Berg then Surface Web is just a tip which is seen in the sea which you were using it till now and will be using in future. But actual mass below is the Deep Web.

DEEP WEB :

Now let’s see what happens in Deep Web and what is stored in it. All online storage like Google Drive, Dropbox, Big University Documents, Research Data, Big Companies and Banks Information & Databases, Government Secret Projects & Files or basically the data which you will never get with a simple Google search are stored in Deep Web. If you want to access Deep Web, you will need a special URL, special address for website or server and you need permission to access that information. It might be a login id and password or any type of authentication, but without that address you will never be able to access the Deep Web. All the websites or web pages, data, information are not indexed by Google, Yahoo or Bing search engine, so in that case you will never be able to see what is stored in my normal Google drive or cloud storage even if you keep searching for it forever. It is accessible only if you have permission for that particular file or folder when shared. We need Deep Web to store all our data to cloud but don’t want to share it with everyone and only to the eligible ones. Its as simple as a company intranet page whereas project document would be shared only with the selected users or employees , but not with all employees and the same is not available on internet search. Deep Web is anyways not a hidden Internet all together, But there is another layer of internet which is hidden from everyone and that is called as Dark Web.

DARK WEB

This is just information we are providing about Dark Web, I request you or either warn you that usage of Dark Web is completely illegal, so never use it. Dark Web is the internet where you can do anything, for example Drugs Trading, Drugs Smuggling, Arms Trading, Arms Smuggling, all other illegal activities which we don’t want to discuss about. We just want to inform you that Dark Web is a Black Stop for Internet where you can do anything and everything, and also this is never shown in any simple search results. If you want to use it, then you will need a special browser called as Onion Router also known as Tor Browser. Dark web can be accessed using Tor Browser through a VPN, but I remind you that this is completely illegal. All the black market can be accessed in Dark Web since it uses Tor Browser which will be bouncing your address all over the world with different notes, only those users can trace you. Currently there is no back trace available for Tor Browser. It was invented for US Navy but nowadays Tor Network is there all over the world connecting entire black market
and many agencies are working to take down the websites in Dark Web as well. Even after all these corrective & preventive techniques, Dark Web still exists in the current Internet and there are lot of
illegal stuff and activities happening which is accessible only on Tor Browser.


**** END ****

Tuesday, 12 April 2016

Creating a Wi-Fi Hotspot in Windows 10

In this post i will show you that how to create a wireless Hotspot in window10 and how to share this connection with other devices. That means if you are using broadband connection or using 3G,4G dongle on your computer then you can share that internet with your smartphone, tablet, laptops etc.

Step 01 : Launch CMD with administrative privileges
Right click on window button left bottom corner and click Command Promt (Admin) option as showing in below image.


Step 02 : Checking required hardware availability :

Before creating WI-FI hotspot we need to check whether wi-fi hostspot is supported by machine or not . To verify this run the following command on command prompt :
       netsh wlan show drivers
If you getting details something like below in image that means your system is supporting wi-fi hotspot.


Step 03 : Create and start connection:

Run the command to create connection :
"netsh wlan set hostednetwork mode=allow ssid=connectionName key=8charpassowrd" 
 This command will just create the connection and to start this connection need to run this command .

Run command to start connection:
"netsh wlan start hostednetwork"
If everything is fine you will the success message as in below image.


Now check you smart phone or tablet in which you can see a Wifi network name as mksWifi as in my case i have given this name.

Once the hosted network is enabled, you can see mksWifi connection listed in the network and sharing center. Now the network needs an internet connection and for this, you need to share the existing active Internet connection. Right click on your existing internet connection and select properties.


Now select the Sharing tab in properties. Check the box against “Allow other network users to connect through this computer’s internet connection”. Then select the newly created Wi-fi connection from the drop down list. Now save the details and close the properties.


Now you can see Internet available on the new Hotspot connection created.


In case you want to stop the hosted network, use this command.
netsh wlan stop hostednetwork
 

Tuesday, 8 March 2016

Using VLOOKUP() function in Excel

VLOOKUP() function is very useful when you want to update a column values by taking some reference from another sheet or same sheet column values.

Here i have two sample sheet first sheet is "Student" in which we have three columns (student name, Grade, Marks) and second sheet is "Grade" in which we have two columns (Grade, marks) as showing in following images.

Sample Sheet01 "Student" :


Sample Sheet02 "Grade" :


Now our objective is to update the column "Marks" of "Student" sheet by referring "Grade" column of second sheet "Grade" using VLOOKUP() function. Following are the steps to update column "Marks" using VLOOKUP() :


  • Select first cell (C2) of marks in  "Student" sheet and hit on formula tab and click on 'Lookup & Reference' and then hit on VLOOKUP as highlighted in below image.


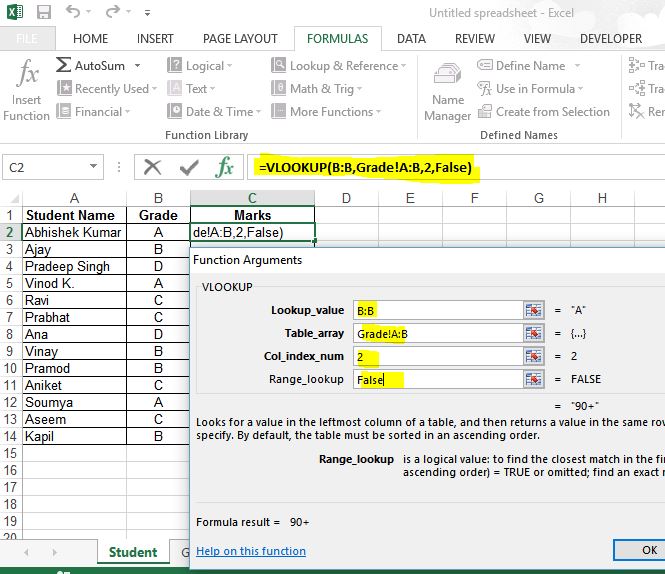
  •  A lookup window will pop-up as showing below image. Select whole column "B" (Grade) to provide the value in "Lookup_value"  .


  • To give the value in "Table_Array" select second sheet and select both the column "Grade" and "Marks"  and give "Col_index_num" = 2 as 'Marks' is in the second column which need to be refer and for "Range_lookup" give as "False" as showing in below image.     
   

  •  Once you complete above steps hit on "OK" button and you can see a complete vlookup formula as =VLOOKUP(B:B,Grade!A:B,2,FALSE) . which will update the cell "C2" with respective marks. Drag and drop it till end to update all the values.


Friday, 12 February 2016

Setting up syntax highlighter on Blogger


Before doing any change on your blog always take the backup of your template. To take backup of your blogger template. Login to your blog and go to template and Click on Backup/Restore button which is at right top corner.

Click on Download full template button. You will get a .xml file of your template which you can save in your system.


  • After taking backup of your blogger click on "Edit HTML" button and copy all css given in this link and paste it before </b:skin> tag.

  • Paste the following code before </head> tag

<script src='http://syntaxhighlighter.googlecode.com/svn/trunk/Scripts/shCore.js' type='text/javascript'></script>
<script src='http://syntaxhighlighter.googlecode.com/svn/trunk/Scripts/shBrushCpp.js' type='text/javascript'></script>
<script src='http://syntaxhighlighter.googlecode.com/svn/trunk/Scripts/shBrushCSharp.js' type='text/javascript'></script>
<script src='http://syntaxhighlighter.googlecode.com/svn/trunk/Scripts/shBrushCss.js' type='text/javascript'></script>
<script src='http://syntaxhighlighter.googlecode.com/svn/trunk/Scripts/shBrushDelphi.js' type='text/javascript'></script>
<script src='http://syntaxhighlighter.googlecode.com/svn/trunk/Scripts/shBrushJava.js' type='text/javascript'></script>
<script src='http://syntaxhighlighter.googlecode.com/svn/trunk/Scripts/shBrushJScript.js' type='text/javascript'></script>
<script src='http://syntaxhighlighter.googlecode.com/svn/trunk/Scripts/shBrushPhp.js' type='text/javascript'></script>
<script src='http://syntaxhighlighter.googlecode.com/svn/trunk/Scripts/shBrushPython.js' type='text/javascript'></script>
<script src='http://syntaxhighlighter.googlecode.com/svn/trunk/Scripts/shBrushRuby.js' type='text/javascript'></script>
<script src='http://syntaxhighlighter.googlecode.com/svn/trunk/Scripts/shBrushSql.js' type='text/javascript'></script>
<script src='http://syntaxhighlighter.googlecode.com/svn/trunk/Scripts/shBrushVb.js' type='text/javascript'></script>
<script src='http://syntaxhighlighter.googlecode.com/svn/trunk/Scripts/shBrushXml.js' type='text/javascript'></script>

  • Now paste the following code before </body> tag.
<script language='javascript'>
dp.SyntaxHighlighter.BloggerMode();
dp.SyntaxHighlighter.HighlightAll('code');
</script>

  • Now hit "Save Template" button to save your changes.

  • Syntax highlighter is ready to use. You can place your code between <pre></pre> tag.
<pre name="code">
...Your html-escaped code goes here...
</pre>

<pre class="python" name="code" >
    print "Hello python! "
</pre>

  • You can Escape your code here.

Monday, 25 January 2016

Using WhatsApp on your PC or Laptop

There is a very good news for WhatsApp users who wish to use WhatsApp on their PC or Laptop. WhatsApp launched a service called WhatsApp Web through which one can use WhatsApp on PC or Laptop.This service might be useful when you are working on your PC/Laptop and dont want to open your mobile to check messages. In this case you can chat with your friends on PC/Laptop using WhatsApp Web service, also you can type faster than on your mobile.Currently this service is available for most of OS like Android, Window Phone, IPhone, BlackBerry, BlackBerry10,Nokia S60 and Nokia S40.


  • To avail this service you need to open Crom browser and go to https://web.whatsapp.com/ . You will see a QR code as in below image which you need to scan by your mobile.


  • To scan the QR code open WhatsApp and go to Menu => WhatsApp Web (Non Android user may have different path ). A QR scanner is ready to scan just move your mobile over QR code. Once it capture the code WhatsApp Web will be started on your Crom browser.

  • To keep continue this service your mobile need to be connected with internet. 

Sharing Airtel 4G dongle internet or any other data card with VMWare/Virtual Machine

It is possible to share Airtel 4G data card or any other data card internet with your VMware or Virtual Machine. You need to do the few setting as given below to achieve this.

  • Plug-in your USB data card and establish an internet connection .
  • Go to the Control Panel =>Network and Internet =>Network Connections. Check  your connection (in my case Mobile Office is my internet connection) and right click on it and go to properties.


  • Click on the sharing tab and check the check box and select Etherent 3 as this is my VMware as shown in above pic. You can select your VM network as per your setting. Save this setting and open your virtual machine.


  • Go to  your Virtual Machine Settings page and click on Network Adapter, choose the Custom and select VMnet8 (NAT)  and hit OK button as following image. All done now try to connect your VM internet connection.


Hopefully it would work for you guys . Thank you !

Sunday, 24 January 2016

Run two Skpe accounts at the same time


By default Skype does not offer to run more than one Skype account on your computer at the same time. But it is quite possible to run multiple Skype account on your computer simultaneously. This might be useful if you wish to use your work account and personal account at the same time. If you want to be signed in to both accounts at the same time, you need to create a new instance of Skype.

  • Open file explorer and go to the "C:\Program Files (x86)\Skype\Phone" or "C:\Program Files\Skype\Phone" and right click on Skype.exe and select Send to > Desktop ( Create  shortcut )


    • Go to desktop and find the shortcut which you have created right now then right click on it and select properties.
    • Click on shortcut tab and in the Target field add /secondary to end of the path. The target field should  be like "C:\Program Files\Skype\Phone\Skype.exe" /secondary or "C:\Program Files (x86)\Skype\Phone\Skype.exe" /secondary ( In case if you are running a 64-bit operating system). 


    • Make sure there is a space between Skype.exe" and /secondary . Now hit on Apply button and save this setting by clicking OK button.
    • Now you will have two Skype shortcut on the desktop. Double click on shortcuts and enjoy two account simultaneously. 


    Saturday, 23 January 2016

    Lock Folder Without Installing any Software


    Hello friends in this tutorial i will teach you how to lock a folder without any software. Basically i will use a simple batch script which enables you to create a password protected folder. This trick will work for only window OS. Just go through the following steps to achieve this cool trick.

    Step 1 : Open a notepad and paste the following code in it.

    cls
    @ECHO OFF
    title Folder Private
    if EXIST "Control Panel.{21EC2020-3AEA-1069-A2DD-08002B30309D}" goto UNLOCK
    if NOT EXIST Private goto MDPrivate
    :CONFIRM
    echo Are you sure u want to Lock the folder(Y/N)
    set/p "cho=>"
    if %cho%==Y goto LOCK
    if %cho%==y goto LOCK
    if %cho%==n goto END
    if %cho%==N goto END
    echo Invalid choice.
    goto CONFIRM
    :LOCK
    ren Private "Control Panel.{21EC2020-3AEA-1069-A2DD-08002B30309D}"
    attrib +h +s "Control Panel.{21EC2020-3AEA-1069-A2DD-08002B30309D}"
    echo Folder locked
    goto End
    :UNLOCK
    echo Enter password to Unlock folder
    set/p "pass=>"
    if NOT %pass%==PASSWORD goto FAIL
    attrib -h -s "Control Panel.{21EC2020-3AEA-1069-A2DD-08002B30309D}"
    ren "Control Panel.{21EC2020-3AEA-1069-A2DD-08002B30309D}" Private
    echo Folder Unlocked successfully
    goto End
    :FAIL
    echo Invalid password
    goto end
    :MDPrivate
    md Private
    echo Private created successfully
    goto End
    :End
    

    Step 2: Save the notepad file as a locker.bat ( the file extension .bat is mandatory )
                Once you save the file you will see the your saved file something like below image


    Step 3: Double click on locker.bat a folder will be created with name as 'Private'. Basically this 
                 is the folder where you can lock your all private stuffs.


    Step 4:  Now copy all your contents which you want to lock into this folder  and double click on
                 locker.bat. Command prompt will pop up for confirmation, So type 'y' to lock the folder 
                 and hit Enter.


     Step 5: You can observe that the folder has been locked and disappeared. Now to unlock the
                  folder again double click on locker.bat. Command prompt will ask you to enter the 
                  password.


    Step 6: Enter the default password "PASSWORD" ( capital letters ) and hit enter.
                 The locked folder will be appear again.

    Note :  To reset your own password right click on locker.bat and choose edit. Search for capital
                PASSWORD at line number 23 and enter your own password and save file again. 
                In this way if you forget your password you can open file and find the password.

      
    Related Posts Plugin for WordPress, Blogger...