Monday, 25 January 2016

Using WhatsApp on your PC or Laptop

There is a very good news for WhatsApp users who wish to use WhatsApp on their PC or Laptop. WhatsApp launched a service called WhatsApp Web through which one can use WhatsApp on PC or Laptop.This service might be useful when you are working on your PC/Laptop and dont want to open your mobile to check messages. In this case you can chat with your friends on PC/Laptop using WhatsApp Web service, also you can type faster than on your mobile.Currently this service is available for most of OS like Android, Window Phone, IPhone, BlackBerry, BlackBerry10,Nokia S60 and Nokia S40.


  • To avail this service you need to open Crom browser and go to https://web.whatsapp.com/ . You will see a QR code as in below image which you need to scan by your mobile.


  • To scan the QR code open WhatsApp and go to Menu => WhatsApp Web (Non Android user may have different path ). A QR scanner is ready to scan just move your mobile over QR code. Once it capture the code WhatsApp Web will be started on your Crom browser.

  • To keep continue this service your mobile need to be connected with internet. 

Sharing Airtel 4G dongle internet or any other data card with VMWare/Virtual Machine

It is possible to share Airtel 4G data card or any other data card internet with your VMware or Virtual Machine. You need to do the few setting as given below to achieve this.

  • Plug-in your USB data card and establish an internet connection .
  • Go to the Control Panel =>Network and Internet =>Network Connections. Check  your connection (in my case Mobile Office is my internet connection) and right click on it and go to properties.


  • Click on the sharing tab and check the check box and select Etherent 3 as this is my VMware as shown in above pic. You can select your VM network as per your setting. Save this setting and open your virtual machine.


  • Go to  your Virtual Machine Settings page and click on Network Adapter, choose the Custom and select VMnet8 (NAT)  and hit OK button as following image. All done now try to connect your VM internet connection.


Hopefully it would work for you guys . Thank you !

Sunday, 24 January 2016

Run two Skpe accounts at the same time


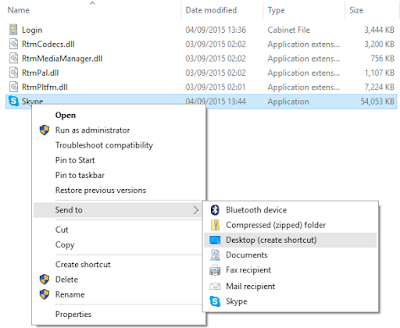
By default Skype does not offer to run more than one Skype account on your computer at the same time. But it is quite possible to run multiple Skype account on your computer simultaneously. This might be useful if you wish to use your work account and personal account at the same time. If you want to be signed in to both accounts at the same time, you need to create a new instance of Skype.

  • Open file explorer and go to the "C:\Program Files (x86)\Skype\Phone" or "C:\Program Files\Skype\Phone" and right click on Skype.exe and select Send to > Desktop ( Create  shortcut )


    • Go to desktop and find the shortcut which you have created right now then right click on it and select properties.
    • Click on shortcut tab and in the Target field add /secondary to end of the path. The target field should  be like "C:\Program Files\Skype\Phone\Skype.exe" /secondary or "C:\Program Files (x86)\Skype\Phone\Skype.exe" /secondary ( In case if you are running a 64-bit operating system). 


    • Make sure there is a space between Skype.exe" and /secondary . Now hit on Apply button and save this setting by clicking OK button.
    • Now you will have two Skype shortcut on the desktop. Double click on shortcuts and enjoy two account simultaneously. 


    Saturday, 23 January 2016

    Lock Folder Without Installing any Software


    Hello friends in this tutorial i will teach you how to lock a folder without any software. Basically i will use a simple batch script which enables you to create a password protected folder. This trick will work for only window OS. Just go through the following steps to achieve this cool trick.

    Step 1 : Open a notepad and paste the following code in it.

    cls
    @ECHO OFF
    title Folder Private
    if EXIST "Control Panel.{21EC2020-3AEA-1069-A2DD-08002B30309D}" goto UNLOCK
    if NOT EXIST Private goto MDPrivate
    :CONFIRM
    echo Are you sure u want to Lock the folder(Y/N)
    set/p "cho=>"
    if %cho%==Y goto LOCK
    if %cho%==y goto LOCK
    if %cho%==n goto END
    if %cho%==N goto END
    echo Invalid choice.
    goto CONFIRM
    :LOCK
    ren Private "Control Panel.{21EC2020-3AEA-1069-A2DD-08002B30309D}"
    attrib +h +s "Control Panel.{21EC2020-3AEA-1069-A2DD-08002B30309D}"
    echo Folder locked
    goto End
    :UNLOCK
    echo Enter password to Unlock folder
    set/p "pass=>"
    if NOT %pass%==PASSWORD goto FAIL
    attrib -h -s "Control Panel.{21EC2020-3AEA-1069-A2DD-08002B30309D}"
    ren "Control Panel.{21EC2020-3AEA-1069-A2DD-08002B30309D}" Private
    echo Folder Unlocked successfully
    goto End
    :FAIL
    echo Invalid password
    goto end
    :MDPrivate
    md Private
    echo Private created successfully
    goto End
    :End
    

    Step 2: Save the notepad file as a locker.bat ( the file extension .bat is mandatory )
                Once you save the file you will see the your saved file something like below image


    Step 3: Double click on locker.bat a folder will be created with name as 'Private'. Basically this 
                 is the folder where you can lock your all private stuffs.


    Step 4:  Now copy all your contents which you want to lock into this folder  and double click on
                 locker.bat. Command prompt will pop up for confirmation, So type 'y' to lock the folder 
                 and hit Enter.


     Step 5: You can observe that the folder has been locked and disappeared. Now to unlock the
                  folder again double click on locker.bat. Command prompt will ask you to enter the 
                  password.


    Step 6: Enter the default password "PASSWORD" ( capital letters ) and hit enter.
                 The locked folder will be appear again.

    Note :  To reset your own password right click on locker.bat and choose edit. Search for capital
                PASSWORD at line number 23 and enter your own password and save file again. 
                In this way if you forget your password you can open file and find the password.

      
    Related Posts Plugin for WordPress, Blogger...